LINH KIỆN CẦN CÓ
Mạch dò kim loại sử dụng Ardunio : Hệ thống cảm ứng xung (PI) sử dụng một cuộn dây duy nhất làm cả máy phát và máy thu. Công nghệ này gửi các dòng điện (xung) mạnh và ngắn qua một cuộn dây. Mỗi xung tạo ra một từ trường ngắn. Khi xung kết thúc, từ trường đảo cực và giảm rất đột ngột, dẫn đến một đột biến điện mạnh. Sự tăng vọt này kéo dài vài micro giây và gây ra một dòng điện khác chạy qua cuộn dây. Dòng điện này được gọi là xung phản xạ và cực kỳ ngắn, chỉ kéo dài khoảng 30 micro giây. Một xung khác sau đó được gửi đi và quá trình lặp lại. Nếu một mảnh kim loại nằm trong phạm vi của đường sức từ, cuộn dây nhận có thể phát hiện ra sự thay đổi cả về biên độ và pha của tín hiệu nhận được. Lượng thay đổi biên độ và thay đổi pha là một dấu hiệu cho kích thước và khoảng cách của kim loại,
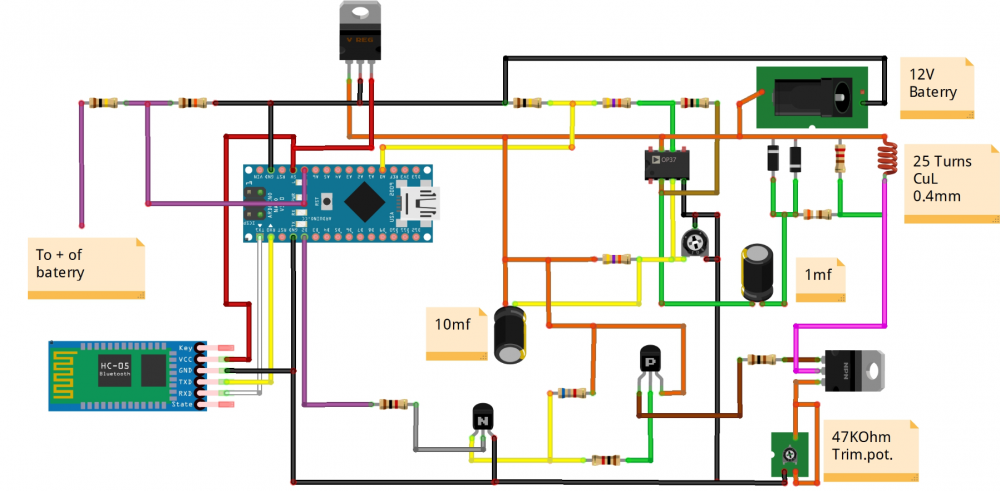
Tôi đã tìm thấy một ví dụ điển hình về máy dò PI trên trang web của các dự án NECO. Máy dò kim loại này là sự kết hợp của Arduino và Android. Trên Cửa hàng Play, bạn có thể tải xuống phiên bản miễn phí của ứng dụng “Spirit PI”, có đầy đủ chức năng, nhưng bạn cũng có thể mua phiên bản chuyên nghiệp có một số tùy chọn tốt. Giao tiếp giữa điện thoại thông minh và arduino được thực hiện bằng mô-đun bluetooth HC 05, nhưng bạn có thể sử dụng bất kỳ bộ điều hợp bluetooth nào mà bạn phải chuyển tốc độ truyền sang 115200. Sơ đồ được đưa ra trong hình bên dưới. Tôi đã thực hiện một số sửa đổi nhỏ đối với sơ đồ ban đầu để cải thiện các tính năng của thiết bị. Bạn có thể tìm sơ đồ gốc tại web NECO-s:
https://neco-desarrollo.es/pirat-wireless-metal-detector
Ở vị trí của điện trở 150 ohm, tôi đặt một chiết áp trimer có giá trị 47 Kohms. Trimer này điều chỉnh dòng điện qua cuộn dây. Khi tăng giá trị của nó, dòng điện qua cuộn dây tăng và độ nhạy của thiết bị tăng lên. Sửa đổi thứ hai là tông đơ nồi 100kOhm thay vì điện trở 62k ban đầu. Với trimer này, chúng tôi đặt điện áp khoảng 4,5V cho đầu vào A0 trên Arduino, bởi vì tôi nhận thấy rằng đối với các bộ khuếch đại hoạt động và điện áp hoạt động khác nhau, giá trị của điện trở này sẽ khác nhau.
Trong trường hợp cụ thể này, để cấp nguồn cho thiết bị, tôi sử dụng 4 pin lithium ion được mắc nối tiếp để điện áp lớn hơn 15v. Vì Arduino chấp nhận điện áp đầu vào tối đa là 12V, tôi đặt một bộ ổn định cho 5V (7805) được gắn trên bộ tản nhiệt nhỏ để cấp nguồn trực tiếp cho Arduino đến chân + 5v.
Cuộn dây được làm từ dây đồng cô lập có đường kính 0,4 mm và chứa 25 cuộn dây có dạng hình tròn với đường kính 19 cm. cuộn dây (các phần tử phải được dán bằng keo và không có vít)
Như bạn có thể thấy trên video, một đồng xu kim loại nhỏ có thể được phát hiện ở khoảng cách 10-15 cm, trong khi một vật thể kim loại lớn hơn từ 30-40 cm trở lên. Đây là những kết quả tuyệt vời, có tính đến việc chế tạo và cài đặt thiết bị tương đối đơn giản.
CODE
#include <EEPROM.h>
//#include <SoftwareSerial.h>
//int bluetoothTx = 5;
//int bluetoothRx = 6;//blutoth module terminal RX
//SoftwareSerial bluetooth(bluetoothTx, bluetoothRx);
#define pulsePine 2
int timer = 200;
const int button1 = 12;
int buttonState1 = 0;

char data;
//EEPROM variables
int addr_duty = 0;
int addr_freq = 1;
int stored_value;
int duty_cycle;
int duty_cycle_temp;
int freq;
int freq_temp;
int duty_def_value = 10;
int freq_def_value = 60;
//Balance variables
int value_count = 0;
int value_count_def = 100;
int balance_value = 0;
int balance_value_temp = 0;
//****
unsigned long startMillis;
unsigned long currentMillis;
long period = 100000;  //the value is a number of microseconds
//Measuring of level of the battery
float resistencia1 = 101000; //Resistencia de 100K para medir la tencion (Voltios)/Resistance of 100k for test volts
float resistencia2 = 10000; //Resistencia de 10k para medir la tencion (Voltios)/Resistance 10k for test volts
float const arefVolt=4.8f; //pin "4.9v" SET EXACT VALUE HERE
float voutv;
float vinv;
unsigned long startMillisVolts;
unsigned long currentMillisVolts;
long periodVolts = 2000;  //the value is a number of microseconds
int sensorValue ;

void setup() {
  //analogReference(INTERNAL);
 Serial.begin(115200);
 readFromStorage(addr_duty);
  duty_cycle = stored_value;
  readFromStorage(addr_freq);
   freq = stored_value;
  if(duty_cycle == 0 || duty_cycle == 255){
    writeToStorage(duty_def_value,addr_duty);
    readFromStorage(addr_duty);
  duty_cycle = stored_value;
  }

  if(freq == 0 || freq == 255 ){
    writeToStorage(freq_def_value,addr_freq);
     readFromStorage(addr_freq);
   freq = stored_value;
  }


  pinMode(pulsePine, OUTPUT);

}


void loop() {
  currentMillis = micros();
  currentMillisVolts = millis();

   if(Serial.available()>0)
 {
  data =  Serial.read();
  setDutyAndFreq  (data);

}


if (currentMillis - startMillis >= period)
 {

  period = 1000000 / freq;
  // Serial.println(period);
 digitalWrite(pulsePine, HIGH);
 duty_cycle_temp = duty_cycle * 10;
 delayMicroseconds(duty_cycle_temp);
 digitalWrite(pulsePine, LOW);
  //sensorValue = analogRead(A0);

for(int i = 0;i < 3; i++){
  sensorValue = analogRead(A0);

}

delayMicroseconds(10);
sensorValue = analogRead(A0);
sensorValue = sensorValue / 5;
 sendData();


startMillis = currentMillis;
 }
 // Lectura voltios
 if (currentMillisVolts - startMillisVolts >= periodVolts)
 {
lecturaVoltios();
//Serial.println("Lectura voltios");
startMillisVolts = currentMillisVolts;
 }

}


 void writeToStorage(int valor,int addr)
 {
   EEPROM.write(addr, valor);


 }
 int readFromStorage(int addr)
 {
    stored_value = EEPROM.read(addr);

  return stored_value;

 }
 void setDutyAndFreq  (char valor)
 {
   //"n" valor para aumentar duty cycle
   //"m" valor para disminuir duty cycle
   //"j" valor para aumentar la frequencia
   //"k" valor para des,inuir la frequencia
   //"+" valor para aumentar el balance
   //"-" valor para desminuir el balance
   if(valor == 'n')
   {
    // Serial.println("n Recived");
      readFromStorage(addr_duty);
  duty_cycle = stored_value;
  duty_cycle = duty_cycle + 1;
  writeToStorage(duty_cycle,addr_duty);

   }
   else if(valor == 'm')
     {
      //  Serial.println("m Recived");
           readFromStorage(addr_duty);
  duty_cycle = stored_value;
  duty_cycle = duty_cycle - 1;
  writeToStorage(duty_cycle,addr_duty);

     }
     else if(valor == 'j')
     {
    //    Serial.println("j Recived");
          readFromStorage(addr_freq);
  freq = stored_value;
  freq = freq + 10;
  writeToStorage(freq,addr_freq);

     }
     else if(valor == 'k')
     {
     //   Serial.println("k Recived");
                  readFromStorage(addr_freq);
  freq = stored_value;
  freq = freq - 10;
  writeToStorage(freq,addr_freq);

     }
      else if(valor == 'p')
     {
      //  Serial.println("m Recived");

  writeToStorage(0,addr_freq);
  writeToStorage(0,addr_duty);

     }


 }
  //Volt function
void lecturaVoltios(){
  vinv=0.0f;
  voutv=0.0f;
   for (int i=0;i < 100;i++){

   voutv = (analogRead(A7) * arefVolt) / 1023;  //Lee el voltaje de entrada
  vinv += voutv / (resistencia2 / (resistencia1 + resistencia2));  //Fórmula del divisor resistivo para el voltaje final
  if(vinv < 0.9){
  vinv=0.0f;
  }


}
vinv = vinv/100;


}
void sendData()

  {
     /* Serial.print("<");
 Serial.print(sensorValue);
  Serial.print("https://mobitool.net/");
   Serial.print(freq);
    Serial.print("https://mobitool.net/");
     Serial.print( duty_cycle);
       Serial.print("https://mobitool.net/");
     Serial.print( vinv);
 Serial.print(">");
  Serial.println();*/
  String data = "<";
  data +=sensorValue;
  data +="https://mobitool.net/";
  data +=freq;
  data +="https://mobitool.net/";
  data +=duty_cycle;
  data +="https://mobitool.net/";
  data +=vinv;
  data +=">";
 /* bluetooth.print("<");
 bluetooth.print(sensorValue);
  bluetooth.print("https://mobitool.net/");
   bluetooth.print(freq);
    bluetooth.print("https://mobitool.net/");
    bluetooth.print( duty_cycle);
       bluetooth.print("https://mobitool.net/");
     bluetooth.print( vinv);
 bluetooth.print(">");*/
  Serial.println(data);
    }
Sơ đồ mạch dò kim loại sử dụng Ardunio