One of the major problems in circuit design is the identification of pin connections of Transistors, SCR, TRIAC, and similar devices. To get an idea about the pins, we have to search for the datasheet or other sources to complete the circuit connections. Wrong pin connection will totally lead to circuit failure. Here is a ready reckon to identify the pins of most of the general purpose components. Given below is a brief guide about the pin identification of almost every electronic device used in the circuits.
Pin Identification of Transistors
1. Bipolar Junction Transistor (BJT)

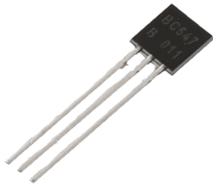
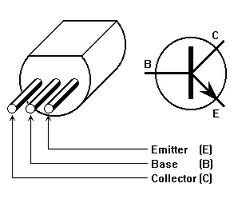
Transistors may be NPN or PNP which are available in the Plastic casing or Metal Can package. In plastic casing, one side of the transistor is Flat which is the front side and the pins are arranged serially. To identify the pins, keep the front flat side facing you and count the pins as one, two etc. In most NPN transistors it will be 1 (Collector), 2 (Base) and 3 ( Emitter ). Thus CBE. But in PNP transistors, the condition will be just reversed. That is EBC.


NPN PNP

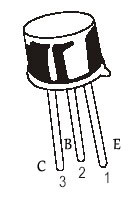
In Metal can types, the pins are arranged circularly. Just see a Tab in the rim. In NPN type, the pin close to the Tab is Emitter, the opposite one, the Collector and the middle one, base. In PNP type the pins are reversed. Pin close to the Tab is Collector.
But this is not a standard pin configuration. The pin arrangement may vary in some transistors. So to get an idea, the following table will help you
2. Field Effect Transistor(FET)
To identify a Field Effect Transistor, one should keep the curved portion facing him/her and start counting in the anti-clockwise direction. The 1st one is the source, then the gate and then the drain.
3. MOSFET – Metal Oxide Semiconductor Field Effect Transistor
Usually, in some cases, the pins of MOSFET are accordingly labeled as G, S, and D denoting Gate, Source, and Drain. In some cases, it is recommended to consult the datasheet of the MOSFET. Normally making the flat side faced towards you, the pins are labeled as S, G, D starting from left to right.
4. IGBT- Insulated Gate Bipolar Transistor
For a few practical IGBTs like GN2470, the raised up surface is placed towards the person holding it such that the shorter one in the middle is the cathode. The one on the left is the Gate and the one on the right is the Emitter.
5. Phototransistor
For practical phototransistors like L14G2, keeping the curved surface towards the person holding it and starting from the clockwise direction, the 1st one is the collector, the second one is the emitter and the third one is the base.
This table shows the pin connections of Regulator IC, MOSFETs, Temperature Sensors, Melody IC, Phototransistor etc

Pin Identification of few Available Diodes
1. LED – Light Emitting Diode
The LED pins can be identified by inspecting the LED from the top view. The one with a flattened edge is the negative pin and the straight pin is the positive pin. Usually, for new LEDs, the positive pin is the one with longer lead and the negative pin is the one with shorted lead.
2. LASER Diode
For practical LASER diodes like DL-3149-057, holding the curved surface towards the person holding it, the pins are numbered from 1 to 3 with the 1st pin being the cathode, the second one being the common pin and the third one being the anode.
3. PN Junction Diode:
The cathode lead is the one near a ring around the body and the other is the anode lead.
4. Photodiode:
For practical photodiodes like QSD2030F, keeping the curved surface towards the person holding the device, the shorter terminal is the cathode whereas the longer one is the anode.
Identifying Pins of Power Electronic Devices
1. Silicon Controlled Rectifier (SCR)
SCR is a three pin device and its pins are Anode (+) Cathode (-) and a Gate. Current flows from Anode to Cathode when the Gate gets a positive pulse. Once triggered, the SCR will latch and continue to conduct even if the gate voltage is removed. To switch off it, we have to break the anode current through switch off.

Like Transistors, the SCR pins can be identified by keeping the front side towards you. The Code printed side is the front mobitool.net 136, BT 138 and ST44B are TRIACs.
2. TRIAC

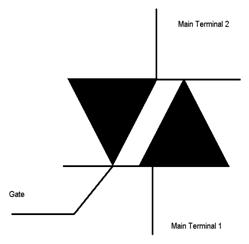
In some TRIACs like 2N6071A/B keeping the flat surface towards your side, the pins are numbered from 1 to 3. Pin 1 is the main terminal 1, pin 2 is the main terminal 2 and pin 3 is the Gate terminal. In some cases like TRIACs by Siemens, the two terminals which can be seen are gate and cathode, with the shorter one being the gate and the longer one is the cathode. The Anode terminal is the metallic contact on the screw part of the TRIAC.
3. UJT – Unijunction Transistor
The pin configuration is the same as that of a Bipolar Junction Transistor. Usually, the device is held such that the flat side is facing toward the person. The pins are numbered from 1 to 3 starting from left to right. Pin 1 is the anode, Pin 2 is the Gate and Pin 3 is the cathode. A practical example is 2N6027. For few UJTs like 2N2646, holding the device such that the pins are downwards and starting from clockwise direction, the 1st one is the Base1 terminal, the second or the middle one is the Emitter terminal and the third one is the Base2 terminal.

Identifying pins of IR Modules
Various types of Infrared Modules are available. There is a projected part in one side which is the front side. The pin connection of common IR sensors is given below

Identifying pins of different Integrated Circuits
1. TSOP sensor
For few photosensors like TSOP sensor, the curved surface is held such that starting from left, the first pin is the ground pin, second is Vcc and third is the output pin.
2. Motor Driver IC L293D
Like any other Integrated Circuits, this IC also consists of a curved spot on one of its end. Starting from the left-hand side of the curve, the pins are numbered from 1 to 8 and the remaining pins are on the right-hand side numbered from 9 to 16, from bottom to top.
3. Relay Driver IC
Pin Identification is same as that of Motor driver IC except that instead of just a curved spot, one end of it is completely cutoff in the middle to form a curved surface.
Photo Credit:
- Transistor by tandyonline
- SCR by wikimedia
- TRIAC by wikimedia